Zulfiqar's weblog

Architecture, security & random .Net

Federating Azure AD with thinktecture Identity Server – Notes

Posted by zamd on February 6, 2015

First of all my apologies for not doing a good job here. I always planned to contribute this to the excellent identity server  but I never got enough bandwidth to do so. I’m constantly receiving request to share the details here so I decided to share notes/steps required to enable this and hopefully someone from community would do the bits I have long promised.

Here are steps…

  1. Create a basic STS or tweak & use the lovely thinktecture IdentityServer v2 (my recommendation)
  2. Within identity server, add a Relying Party Trust to ‘urn:federation:MicrosoftOnline’ which is the unique identifier used by of Azure AD for federation.
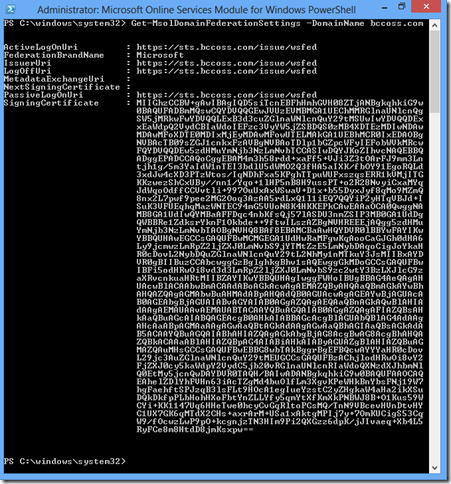
  3. Establish a trust relationship between identity server and Azure AD using the Set-MsolDomainAuthentication cmdlet. This is how my trust relationship look like:

Office365 Federation Working

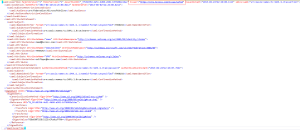
4. The IssuerUri MUST match the issuer URI of SAML assertion.

assertion-azure-ad-fed


5. The protocol MSUT be WS-Federation for browser-based SSO

6. Following claims MUST be included in the issued tokens

7. The UPN must also be set as a name identifier.

Identity server code change # 1


var nameid = new Claim(ClaimTypes.NameIdentifier, “7960192”);
nameid.Properties[ClaimProperties.SamlNameIdentifierFormat] = “urn:oasis:names:tc:SAML:1.1:nameid-format:unspecified”;
var outputClaims = new List<Claim> {

new Claim(“http://schemas.microsoft.com/LiveID/Federation/2008/05/ImmutableID”,”7960192″),
new Claim(“http://schemas.xmlsoap.org/claims/UPN”, “zulfiqar@bccoss.com”),
nameid
};


8. The signing algorithm MUST be SHA-1. Signing certificate can be a self-signed SSL certificate.

Identity server code change # 2


scope.SigningCredentials = new X509SigningCredentials(signingCert, SecurityAlgorithms.RsaSha1Signature, SecurityAlgorithms.Sha1Digest);


9. The token MUST be sent to: https://login.microsoftonline.com/login.srf

Looking forward to see this in identity server soon…

Posted in Azure AD, Federation/STS, Office 365, SSO, Windows Azure | Tagged: | Leave a Comment »

Redis vs Couchbase

Posted by zamd on October 10, 2014

Recently in my project, we experienced latency issues which required us to introduce a caching layer in our architecture. I evaluated Couchbase & Redis as potential technology choices and have decided to go with Redis as it nicely fits our data & computation model. In this post, I’ll briefly share our requirements, data model and the factors which lead us to choose Redis over Couchbase.

Our latency issues were twofold:

  • Large data returned from various corporate services like Stock levels, Product & Price etc. This data is mostly reference/semi-static and is cachable (for hours at least)
  • Running computation (matching, copying & intersection) on large lists of objects and copying them back & forth from cache

The data structures involved in our solutions were set of tuples (2-tuples) containing a TPNB(identifier) and a number, which nicely aligns with the Redis Sorted Set data structure, where each member of the set has a key and a score.

Canonical Data Model

Stock Count

TPNB

Count

018616111

3

018616112

4

Ledger Stock Level

TPNB

Level

018616111

4

018616112

7

Stock Count Variance

TPNB

Variance

018616111

-1

018616112

-3

Product Price

TPNB

Price

018616111

9.99

018616112

2.99

Category-H71

TPNB


018616111


018616112


018616113


018616114


The power of Redis comes from the fact that you can perform operations directly on the sets. Couchbase has no such facility and you are required to retrieve target documents into the application server and apply your logic/computation to store the resultant document back in the cache. The Redis architecture significantly reduces data copying in and out of cache by pushing computation to the data.

We started by storing Ledger stock level as a sorted set. Each [TPNB, Level] pair was stored as a distinct element within the set and we used standard ZADD command inside a transaction to populate the set.

multi

zadd sc.03211.ledger 4 018616111

zadd sc.03211.ledger 7 018616112

exec

When we start the stock count, we simply union the ledger set with a non-existent set to create our count variance set. This is a single instruction in Redis and no data is copied in or out of cache.

zunionstore sc.03211.variance 2 sc.03211.ledger non-existent-set

When we need to start the count, we need the same product boundary as the ‘ledger set’ but all the product counts needs to reset to ‘0’. For this, we again used a union operation with a weight of ‘0’ & cloned the ledger position as our ‘start count’ position.

zunionstore sc.03211.count 2 sc.03211.ledger non-existent-set WEIGHTS 0 0

Couchbase’s memcached type buckets have a max ‘value size’ limit of 1MB, which means we can’t store our data objects as a single key-value item, even the 20MB limit of Couchbase [type] buckets would be a stretch in some cases.

Redis has no real data size limit and can store up to 4 billion members in a sorted set.

Once the initial data structures were set up, we use INCR & DCR commands in a transaction to increment count & decrement variance in real time based on our inventory scan event stream.

We categorize our variance by simply intersecting the relevant ‘category set’ with ‘variance set’ and storing the resulting set a ‘categorized-variance’. Again this is a single Redis instruction requiring no data copying

zinterstore sc.032111.variance.h71 2 sc.032111.variance product. cat.h71 WEIGHTS 1 1

Redis also offers the ability to run custom logic inside the cache as Lua scripts. In the example below, we used a custom script to price the variance by multiplying each product count with unit price

local leftSetId = KEYS[1]

local rightSetId = KEYS[2]

local destSetId = KEYS[3]


local data = redis.call(‘zrange’, leftSetId, 0, -1, ‘WITHSCORES’)

for k, v in pairs(data) do

    if k % 2 == 1 then

        local val  = v

        local leftScore = tonumber(data[k + 1])

        local rightScore = tonumber(redis.call(‘zscore’, rightSetId, val))


        if rightScore then

            redis.call(‘zadd’, destSetId, leftScore * rightScore, val)

        end

    end

end

return ‘ok’

Redis has built-in support for master/slave replication through its Sentinel platform. A cluster of master/slave nodes can be deployed across data centres and Sentinel can provide auto-failover when the master goes down. Sentinel publishes key failover events using the Redis pub/sub & client can use these events to reconfigure themselves to the new master once a failover is completed.

Redis cluster is currently under development and would enable auto-sharding and transparent failover on top of the current replication model. The currently proposed model is very similar to Couchbase where dumb clients simply tries a random instance & gets redirected if the target instance doesn’t master the key. Smart Clients cache the cluster map and always go to the correct host based on the cached cluster map.

Currently proxy solutions like twimproxy can be used to provide auto-sharding on top of Sentinel replication.

In summary, Redis was more than a simple key/value store for us. The fact we can run computation inside the cache to filter, merge and group data was the key differentiator for Redis against Couchbase.

The clustering and high availability support in Redis is still bit lacking which makes it a risky choice as the master/primary data store of the application. In such scenarios, Couchbase should be the preferred technology choice.


Posted in Couchbase, Redis | Tagged: | 3 Comments »

Queues and Workers

Posted by zamd on October 10, 2014

In the last post, I briefly talked about the architecture of project I’m currently leading. We got a clear read/write separation in the architecture and for past few sprints we are pushing more & more work on the write path which made our write pipeline a bit heavy. Our challenge is to quickly process huge bulk of tags flowing through the write pipeline. Just to give you an idea of the numbers:

The business process involves doing an “all clothing” stock count every Monday between 06:00 – 09:00 AM. For our UK deployment, we are aiming 600 stores each containing an inventory of roughly 80k garments. To get good accuracy from RFID tags, all inventory must be counted at least twice.  The usual process is, a group of people count the backroom and shop floor in parallel – they then swap and count again.  So the math look like this:

80K * 600 = 48 million * 2 = 96 million tags

These needs to be processed within 3 hours which equates to roughly 10,000 commands/tags/second to our backend service.

We already spent quite a bit of time to optimize the inventory pipeline and 99th percentile latency is below 100ms which is reasonably good considering we are using NHibernate & Oracle and calling bunch of backend services. There is further juice we can extract out of inventory pipeline but realistically to process all this load, we need to scale out the system.  We kind of knew this from day one, so we designed the system in a way where commands are pretty much queuable after some simple invariants checking.

We came with a very simple scale model to run multiple workers behind a set of queues – we started by re-hosting our domain in a worker process (a simple console application, the plan is to use NSSM in production). This simple model works great – workers compete for the commands, a single worker read a command under peak-lock and run the unit of work(UOW). If UOW cannot be committed, message is simply retried on another worker and in most cases the transient failure (a small race condition :-)) gets resolved on subsequent retries.

With this simple model, we were able to get a throughput of over 2000 tags/second using 16 workers on a single beefy machine.

There is huge number of duplicates in our scenario, so our next attempt was to detect/remove duplicate before they hit our workers. Ideally the messaging system should do this for us – We use Tibco EMS but unfortunately EMS doesn’t have any built de-duping functionality.

We also use Redis as our read store in our architecture – so we decided to build de-duping (on publish) functionality in Redis using the simple Get/Set operation. The results were awesome as we can de-dup a batch of 50 tags in 0.3ms.

This one change has significantly reduced the problem size for us as there are at least 100% duplicates in a stock count and there is no way to avoid them on the client/sender side.  By efficiently de-duping them on server means our workers only has to process 1/2 of the load ~ 5000 tags/sec

Another interesting pattern we have seen is around large UOWs which becomes very in-efficient to be done as a single UOW synchronously. In these situations, a worker simple breaks the larger UOW into ‘N’ smaller UOWs which are queued and then processed in parallel. The downside here is that coding become bit tedious, as we are reading a message from the queue, breaking it down in smaller messages and writing them back in the queue.  It’s not perfect, but it gives us a nice way to break & parallelize large UOWs (and we got plenty of these).

Posted in .net, Architecture, Redis | Leave a Comment »

RFID Stock Management–Architecture & Challenges

Posted by zamd on September 12, 2014

I’m currently working on an RFID based stock management solution – The high level goals of the solution is to ensure, the stock shown on the computer is the stock available in the store, correct products (in correct quantities) are displayed on the shop floor & to reduce stock loss by having a real-time visibility of what’s passing through the tills before it’s taken out of the store. As a start we are only doing this for clothing products where our items are source (factory) tagged with RFID tags and these items are then tracked from deliveries to sale & returns using various types of RFID readers like Handhelds, Fixed Portals, Security Gates and Click & Collect readers etc.

The hardware side of project is interesting but it’s mostly off the shelf readers & gates supplied by Motorola, Checkpoint & Nedap. These readers are doing the bulk of work and we run a simple integration agent on top of them to connect them to our software backend.

Our software backend is SOA based (REST) web services built with ASP.NET Web API & hosted on Windows. From design & implementation perspective, we use CQS, DDD & Event Sourcing and our domain entities are persisted (using NHibernate) in Oracle (Exadata) which is our master data store. We use SpecFlow/NCrunch to automate our acceptance testing and NUnit for unit testing.

We started this as a typical .NET project and had interesting challenges around performance & latency on the read path, which pushed us to do more & more work on the asynchronous write path. We started to separate our read & write stores and decided to build the read store completely in the cache based on the event stream we capture on the write pathh. We started with Couchbase with it’s memcached Data Bucket as our first choice for read store– Couchbase is a great technology, it converges the key-value & document store models into one great product. I love the power & simplicity of it’s map/reduce framework.

For us the Couchbase didn’t work as well as our latency was still high because of the computation involved on huge list of stock data. We needed to bring data streams from the cache into our service and compute variances and categorization etc and then store the computed results back in the cache.

Our next choice was Redis, the Sorted Set data structure in Redis aligned nicely with the data model we need to store & compute. I’m extremely impressed with the power of Redis and ability to run computation in the cache is exactly what we needed. Most of our computation can be done with a single union or intersection command on sorted sets which is a sub millisecond operation. We are actively building on this model and in future posts, I’ll share more details on our architecture and specifics of Redis usage. Our high level architecture looks like this…


image

Posted in Architecture, Couchbase, Redis | Leave a Comment »

AD RMS protection with Custom STS – Setting the scene

Posted by zamd on June 19, 2013

In a world where device are exploding, the information protection becomes even more important. AD RMS provides an on-primses and cloud platform to protect documents. Protected documents can be freely distributed and the information protection platform ensures compliance and prevents unauthorized access.

The developer story of AD RMS was significantly simplified with AD RMS SDK 2.x aka MSIPC. The original MSDRM API was an extremely complex and required specialized skills to program. Version 2.x of the SDK introduced a simple File Protection API which makes it super easy to incorporate IPC in custom solutions. The SDK comes with a native API and there is a managed sample wrapper available as well.

The on-premises AD RMS Server is implemented using a set of web services (asmx based) which provides keys, certificates & license management infrastructure required to enable information protection.

The flow starts with authenticating the user and once the user is authenticated & authorized, key distribution is kicked off to enable protection/un-protection functionality. The default deployment of AD RMS is configured to use Windows Authentication – which means consumers of the protected contents must be part of the Active Directory.

Sometime there are requirements to make protected content (protected docx) available to users who doesn’t live in your Active Directory – for example sharing the protected documents with a partner organization etc.

Another scenario is where you own the users but they are stored in custom databases (SQL membership DB etc) rather than AD & you want this user base to access protected contents using their existing credentials.

To enable such scenarios, the AD RMS supports federated authentication using the standard WS-Federation protocol. There is useful step by step guide on how to use AD FS to enable federated access with partners who doesn’t have AD RMS deployed. This guide covers the first scenario I mentioned above.

To enable 2nd scenario,  you would need to deploy a custom STS (e.g. thinktecture identity server) and integrate it with AD RMS infrastructure using standard trust management and claims transformation.

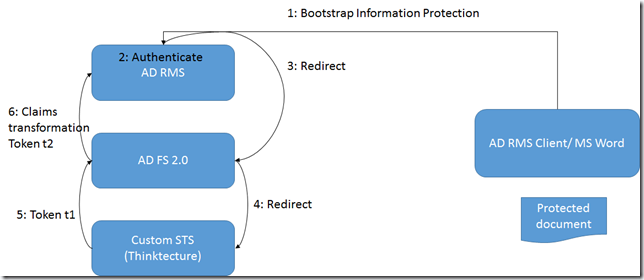
The following figure shows the message flow used to acquire a license to un-protect a protected word document.

image

In a future post, I’ll explain the details of enabling this scenario using ThinkTecture Identity Server as a custom STS.

Posted in AD RMS, Federation/STS, MSIPC | Leave a Comment »

Azure AD OAuth 2.0 Authorization Grant

Posted by zamd on May 17, 2013

Yesterday I talked about a bug which prevented me to complete the authorization grant flow with Azure AD. It turn out the bug is only exposed when using Azure Management Portal for Relying party registration. In this post, I’ll use Graph Explorer to do the registration which works fine.

My scenario is to create a simple MVC application which would do the user authentication against the Azure AD.

Once the user is signed in, the web app then acquires an “access” & “refresh token” for the Graph API (I’ll work with other resources in future) using the 3-leg authorization grant flow.

I started by creating an empty MVC 4.0 application and added a home controller with a simple view displaying the identity & claims of the authenticated user.

image

Running the app gave me the url which I would use to register my app with Azure AD using Graph Explorer.  Registration instruction are available in this blog post under the ‘Setting up permissions’ section. My registration settings looks like this

image

Now back to VS and using the “Identity & Access”, I have externalized the authentication of my app to windows azure AD.

image

The tooling does all the magic and generates required WIF configuration.

<system.identityModel>
<identityConfiguration>
<audienceUris>
<addvalue=http://localhost:45906/ />
</audienceUris>
<issuerNameRegistrytype=System.IdentityModel.Tokens.ConfigurationBasedIssuerNameRegistry, System.IdentityModel, Version=4.0.0.0, Culture=neutral, PublicKeyToken=b77a5c561934e089>
<trustedIssuers>
<addthumbprint=3464C5BDD2BE7F2B6112E2F08E9C0024E33D9FE0name=https://sts.windows.net/{tenantid}/ />
</trustedIssuers>
</issuerNameRegistry>
<certificateValidationcertificateValidationMode=None/>
</identityConfiguration>
</system.identityModel>
<system.identityModel.services>
<federationConfiguration>
<cookieHandlerrequireSsl=false />
<wsFederationpassiveRedirectEnabled=trueissuer=https://login.windows.net/common/wsfedrealm=http://localhost:45906/reply=http://localhost:45906/requireHttps=false />
</federationConfiguration>
</system.identityModel.services>

Now when I run my application, I’m redirected to azure AD for authentication and after signing in, I’m back in my app with following claims.

image

The Authorize action simply redirects to the authorization endpoint requesting an ‘authorization code’.

Acquire authorization code
publicActionResult Authorize()
{
var @params = newNameValueCollection
{
{“response_type”, “code”},
{“client_id”, “87638e3d-6b56-46b6-946f-8b3b9fa6f04e”},
{“resource”, https://graph.windows.net&#8221;},
{“redirect_uri”, Url.Action(“Authorized”, null, null, “http”)}
};
var query = HttpUtility.ParseQueryString(“”);
query.Add(@params);    return Redirect(Constants.AzureADAuthorizationEndpoint + “?” + query);
}


I’m passing Authorized action as the redirect_uri to Azure AD. That’s where AD would send me the ‘authorization code’.

Clicking the ‘Authorize’ link takes me to Azure Ad & after authentication AD redirects my browser back to Authorized action with an authorization code.

http://localhost:45906/Home/Authorized?code=AAAAAAAAcJ3MFRmxlJAB5CwTBrXmI7t8zdfTrUmfPCbGHQCxbWXOxLieUD4r_fah-rnOwQkxS6B_KOSdLhjsf6n5sQghMwu9ynqFD2-qHBfRkxE3DnS8htlHaDqCdG-Wa5MvbRXZeCKUFr-k37n5Mn4T2KCdKx-nkyNheqZJmwmDFWwix_Gi_QJohhUMk-SDyrnV4Jy-tT_gfiKwKRzVi31JmsJV_b8u-5p398GsGfxBlfxuWuNYuUiUOUDdfLQCYbK0urn0HChsndnPuTZJxtJtNH7WdWnUdha108kVctvHW4u8IihV9P10OsM1gT_D67f00SjVIAA

From the Authorized controller action I fire a post request which gives me access and refresh tokens back. Please note, the redirect_uri MUST be same for both authorization code and token request.

Exchange code with tokens
publicasyncTask<ActionResult> Authorized(string code)
{
if (string.IsNullOrEmpty(code))
RedirectToAction(“Index”);    var data = newDictionary<string, string>
{
{“grant_type”, “authorization_code”},
{“client_id”, “87638e3d-6b56-46b6-946f-8b3b9fa6f04e”},
{“redirect_uri”, Url.Action(“Authorized”, null, null, “http”)},
{“client_secret”, “V/7FTVm****************UQi6MkbwhmBqKxz0=”},
{“code”, code}
};

var client = newHttpClient(newWebRequestHandler());
var response = await client.PostAsync(Constants.AzureADTokenEndpoint, newFormUrlEncodedContent(data));
response.EnsureSuccessStatusCode();

var msg = await response.Content.ReadAsStringAsync();
var tokenResponse = JsonConvert.DeserializeObject<TokenResponse>(msg);
return View(tokenResponse);
}

image

The access & refresh tokens are scoped to Graph API in this case. I can now attach this “access token” to my requests to graph API to read/write the directory data. There are few samples on this topic already so I’m not going to cover that in this post.

Source: HomeController.cs

Posted in Azure AD, OAuth 2.0 | Leave a Comment »

Azure AD OAuth 2.0 Client_Credentials Flow

Posted by zamd on May 16, 2013

I was playing with the Authorization code grant type recently added to Azure Active directory however there is bug in the preview implementation which prevents exchange an ‘authorization code’ with an access token.

I can get the authorization code for graph api by using following url in the browser.

https://login.windows.net/69383356-56dd-4e78-a18e-a4ff5450c995/oauth2/authorize?response_type=code&client_id=9f030b74-1ec1-4b6b-8911-f4e6e465ff9d&resource=https://graph.windows.net&api-version=1.0

AAD authenticates me and redirects with an authorization code below.

http://localhost/?code=AAAAAAAAfgMZDe1KgG-yqkz7_upts_gtuQ5RgzoM71bkz3PKJo312flYTAp8PrpaUnl3nMaRF_asmQnEZpMjQSflFRJoFl0nVO5HyGnyRG2haLQAM7kz0wrW3I_D2s5FResTcc2g3hnStrVLWFoAovnw6gjh7Imir3Zistm7ZuJgFkbzMJp8Q1Nm1ZCoqW8W9lDDZtdizd9uI6ALo04OW9jp4bjW9KXshy2x6Nz41N35RzXD2DGiAJP5PqtCB1q54wmRsMauPtKrBxU7Nd3T3cbUV5XJxdNojZWaz-ER-tWYySVNMwLZ0gcRzIp-FMWy3Y7oGsHEpAWrrpmnV3Nx6K2Wb_BIXW-EI6HAQX57HDCFVmhBR8cgAA

At this stage, I should be able to exchange this ‘code’ with an ‘access token’ & a refresh token by issuing following POST request via fiddler.

‘https://login.windows.net/69383356-56dd-4e78-a18e-a4ff5450c995/oauth2/token

User-Agent: Fiddler

Content-Type: application/x-www-form-urlencoded

Host: login.windows.net

Content-Length: 546

grant_type=authorization_code&client_id=9f030b74-1ec1-4b6b-8911-f4e6e465ff9d&redirect_uri=http://localhost/&code=AAAAAAAAU1SjeRieJ2c2QVOayghJbBw-kihXTp7BrG10v73WsqEzFVgsgm3SfYv64_mT9WXFU02vvoVY8J7AxuAfcbJ9fysCW3TI3zixbrwPoz2rZruWJVMT5J7XSI34nxRA13kXIvwf8Sbv7EALsJw-2V56jCFz1sXNwQkkw7UBWX72qvlCP6CuhX0Rqw6LI_4Uqh5dk9D6MLNk02ttTyKnrMkFqV0eN96DhuYZXYD_dF331of8_AULAvkGNGwQzCcqCpws57X8l2rmczkDjvXTAQD2yC6Pb_Hq7eBNNxvFHKTR0D9gquwmPsXVY_jDae2nOa7fI4JdNM92Nto0UFLVoVnIuhxGhhIQzxLz9qb_b-I6fnUgAA&client_secret=V62j8vqo4pRHpCSOK/+jSa1ww=+V62j8vqo4pRHpCSOK/+jSa1ww=

However doing this results in a ‘ACS50000: There was an error issuing a token. ACS70001: Error validating credentials. ACS50012: Invalid client secret is provided’ error. I’ll do a follow up post when this bug is fixed.

My second choice was to use the simple client_credentials (also known as two-leg) flow.

This time I used fiddler to craft a POST request to directly acquire a token from AAD OAuth 2.0 endpoint.

https://login.windows.net/69383356-56dd-4e78-a18e-a4ff5450c995/oauth2/token?api-version=1.0

User-Agent: Fiddler
Content-Type: application/x-www-form-urlencoded
Host: login.windows.net
Content-Length: 178

grant_type=client_credentials&client_id=9f030b74-1ec1-33s3-8911-f4e6e465ff9d&client_secret=V62j8vqo4pRHpCSOK/+jSa1ww=+V62j8vqo4pRHpCSOK/+jSa1ww=&resource=http%3A%2F%2Flocalhost%2F

image

I got 200 OK with JWT token as the payload. I can now attach this token to my REST services where I can process it using the WIF JWTTokenHandler extension as shown below:

  1. static void Main(string[] args)
  2. {
  3.     var handler = new JWTSecurityTokenHandler();
  4.     var token = (JWTSecurityToken)
  5.     handler.ReadToken(
  6.         "eyJ0eXAiOiJKV1QiLCJhbGciOiJSUzI1NiIsIng1dCI6Ik5HVEZ2ZEstZnl0aEV1THdqcHdBSk9NOW4tQSJ9.eyJhdWQiOiJodHRwOi8vbG9jYWxob3N0LyIsImlzcyI6Imh0dHBzOi8vc3RzLndpbmRvd3MubmV0LzY5MzgzMzU2LTU2ZGQtNGU3OC1hMThlLWE0ZmY1NDUwYzk5NS8iLCJuYmYiOjEzNjg3Mzk2NTYsImV4cCI6MTM2ODc4Mjg1Niwic3ViIjoiY2MyMjQ1NTQtZDhlZC00YTY0LThmZjUtOTJiZjNiYjEzZDkyIiwiYXBwaWQiOiI5ZjAzMGI3NC0xZWMxLTRiNmItODkxMS1mNGU2ZTQ2NWZmOWQiLCJvaWQiOiJjYzIyNDU1NC1kOGVkLTRhNjQtOGZmNS05MmJmM2JiMTNkOTIiLCJ0aWQiOiI2OTM4MzM1Ni01NmRkLTRlNzgtYTE4ZS1hNGZmNTQ1MGM5OTUiLCJpZHAiOiJodHRwczovL3N0cy53aW5kb3dzLm5ldC82OTM4MzM1Ni01NmRkLTRlNzgtYTE4ZS1hNGZmNTQ1MGM5OTUvIn0.BLtqbzU5pEyn5c6ubQxu2UPzoCd_I9Rokycq4LqThWGkdAy9vL3vqptAHXlKOTK-VFPkarfJ1Jui-GaiGZE_BKLFW0x_cxv4bTx_fAktTsDK51iv9wD8jYuftrUWaaqoonD29SQxRmic_r38LBqJwQIJRO4IfMUeMLmgYQ7B1DQs24D9oSx36pyc7CzX3sZH-nfbNPF4z8wUHrX0zzf7KwWCu5RhK6wmXKbiNKaMIw3VzTq6KsEbqFBV-3IuGFSGadrUfpJG0KZrEc3ZhNJ_gEWuBwhwTKtaVrWQ3_1wyxTtdKG1dPuVZmFxKCIfOJkqsvTFZKD4bECv5DJfvyhzlQ");
  7.     var validationParams = new TokenValidationParameters
  8.                                {
  9.                                    AudienceUriMode = AudienceUriMode.Never,
  10.                                    SigningTokenResolver = new HardcodedCertResolver(),
  11.                                    ValidateIssuer = false
  12.                                };
  13.     var ci = handler.ValidateToken(token,validationParams);
  14.  
  15.     ci.Claims.ToList().ForEach(c =>
  16.                                Console.WriteLine("{0} = {1}", c.Type, c.Value));
  17.  
  18.     Console.WriteLine(token.ValidTo);
  19.     Console.ReadLine();
  20. }


Hope that helps.

Posted in Azure AD, OAuth 2.0 | Leave a Comment »

CRM Online Entity Creation

Posted by zamd on April 30, 2013

Recently I started exploring the world of Dynamics and specifically Dynamics CRM. Technically the platform looks fairly simple with a reasonably clean web services API (mostly SOAP) & SAML based message security (remember legacy WS-Trust :)) using Live ID as the identity provider.

The helper code from the sdk (\sdk\samplecode\cs\helpercode) hides all the complexity but the under the hood following flow happens to interact with Dynamics Online Web Services.

image

Following is small console application I used to create a new lead into CRM Online.

Code Snippet
    var connection =
        CrmConnection.Parse("Url=https://psfd365.crm4.dynamics.com; User ID=zamd@psfd365.onmicrosoft.com; Password=*password*;");
    var organization = new OrganizationService(connection);

    var who = organization.Execute(new WhoAmIRequest()) as WhoAmIResponse;
    Console.WriteLine("{0}@{1}", who.UserId, who.OrganizationId);
    var user =
    organization.Retrieve("systemuser", who.UserId,
                          new ColumnSet(new[] {"firstname", "lastname"})) as SystemUser;

    Console.WriteLine("creating lead…");

    var newLead = new Lead
                       {
                           Subject = "Interested in dyanamics crm…",
                           FirstName = user.FirstName,
                           LastName = user.LastName,
                           MobilePhone = "004412123231212"
                       };

    var leadId = organization.Create(newLead);
    Console.WriteLine("New lead {0} created.",leadId);
}

that’s it – you can see the new lead created below.

image

Posted in Dynamics CRM | Leave a Comment »

WF Security Pack Update

Posted by zamd on March 13, 2013

Quite a few folks have asked me about updating WF Security Pack to .NET 4.5 as WIF is now integrated into .NET 4.5.

Today I manage to spare sometime to upgrade the WFSP to .NET 4.5/WIF 4.5.  I have also pushed the updated source code to github which you can pull down from https://github.com/zamd/wfsp/

Please note github version of the codebase is different from codeplex, which was refactored by a WF team member. The github version of the source code came straight from laptop. I intend to create a Nuget package and potentially a Visual Studio Extension as well. Stay tuned…

Posted in WF4.5, WFSP | Leave a Comment »

Federating Office 365 (Azure Active Directory) with a Custom STS

Posted by zamd on February 8, 2013

Let’s start of with a clarification: As of today, federating Office 365 (Azure AD) with a Custom STS is NOT supported by Microsoft.  Today the only supported STSs are AD FS 2.0, Shibboleth 2, Optimal IDM Federation Services and PingFederate 6.10.

With that cleared, Office 365 STS supports both WS-Federation & SAML protocols for user authentication which means technically any compatible STS can be used as the Identity Provider STS for Office 365 services or other Relying Parties with a trust relationship with Azure Active Directory.

Azure AD supports In-cloud & Federated Identities.

With In-Cloud identities all user information, including the passwords, are stored in the online directory.

With Federating identities, only basic information is stored in online directory (as shadow accounts) and user identities are mastered in on-premise directories. Passwords are never copied to online directory and Azure AD relies on federation for user sign in.

A key prerequisite for Office 365 SSO is to create federated identities (shadow accounts) in Azure AD and there are different options/tools to do this.

  1. DirSync is the recommended tool but it only supports Active Directory as the identity source. DirSync & AD FS 2.0 are the primary tools to enable federation between an on-premises AD and Azure AD.
  2. Graph API is a new RESTful API to manage online directory and looks very promising for creating cloud-only identities. Graph API today doesn’t support creating Federated identities.
  3. MSOL PowerShell cmdlets: These cmdlets use the SOAP based Provisioning Service and are functionally quite rich. They support most of the operations including the creation of federated identities. I have used these cmdlet for my scenairo. Few commerical tools also wrap these cmdlets to perform various Office 365 provisioning operations.
  4. Forfront Identity Manager (FIM) is another potential option which can create Federated accounts from source directories other than AD but I haven’t explored that in detail.

Now once you have the federated identities provisioned (or synced from your on-premises user identity store) in Azure AD, the next step is to establish a trust relationship between Azure AD and your custom STS. This is assuming you have already done the domain verification etc.

I have used Set-MsolDomainAuthentication cmdlet for this.

Set-MsolDomainAuthentication –DomainName bccoss.com –federationBrandName bccoss.com -Authentication Federated  -PassiveLogOnUri $url -SigningCertificate $certData -IssuerUri $uri -ActiveLogOnUri $ecpUrl -LogOffUri $logoutUrl -PreferredAuthenticationProtocol WSFed

image 

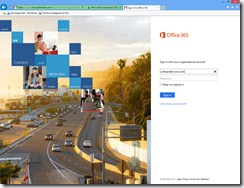
At this stage, if I browse to the Microsoft Online Services portal (http://portal.microsoftonline.com/) and choose to login using my federated domain (@bccoss.com) – I got redirected to my custom STS.

In this case, I’m using Thinktecture STS but that doesn’t work out of box with Office 365 / Azure AD so I have to modify the STS to make it compatible with Azure AD. I’ll explain the Office 365 compatibility requirements of an STS in a future post.

I’ll also try to contribute my Thinktecture modification to code back to git at some point.

image image

image image

image image

Posted in Azure AD, Office 365, SSO | 11 Comments »